Last Updated on February 9, 2019 by Admin
8.2.2.6 Lab – Establish a Console Session with Tera Term Answers
Lab – Establish a Console Session with Tera Term (Answers Version)
Answers Note: Red font color or gray highlights indicate text that appears in the Answers copy only.
Topology


Objectives
Part 1: Access a Cisco Device through the Serial Console Port
- Connect to a Cisco device using a serial console cable.
- Establish a console session using a terminal emulator, such as Tera Term.
Part 2: Erasing and Reloading the Cisco Device
- Erase previously saved settings to return the device to the default state.
Background / Scenario
Various models of Cisco routers and switches are used in networks of all types. These devices are initially managed using a local console connection and then routinely managed using a remote connection. Nearly all Cisco devices have a serial console port to which you can connect.
In this lab, you will learn how to access a Cisco device via a direct local connection to the console port, using a terminal emulation program, Tera Term. You will also learn how to configure the serial port settings for the Tera Term console connection. After you have established a console connection with the Cisco device, you will erase the saved configurations and reload the device.
Note: The routers used are Cisco 1941 ISRs with Cisco IOS Release 15.4(3) (universalk9 image). The switches used are Cisco Catalyst 2960s with Cisco IOS Release 15.0(2) (lanbasek9 image). Other routers, switches, and Cisco IOS versions can be used. Depending on the model and Cisco IOS version, the commands available and output produced might vary from what is shown in the labs.
Answers Note: You may choose to use serial console cables to connect to all the Cisco devices because not all Cisco devices have the USB console ports.
Answers Note: If you are using a Cisco 1941 router or other Cisco IOS devices with a mini-USB console port, you can access the device console port using a mini-USB cable connected to the USB port on your computer.
Answers Note: The mini-USB console cable is the same type of mini-USB cables that are used with other electronics devices, such as USB hard drives, USB printers, or USB hubs. These mini-USB cables can be purchased through Cisco Systems, Inc. or other third-party vendors. Please verify that you are using a mini-USB cable, not a micro-USB cable, to connect to the mini-USB console port on a Cisco IOS device.
Required Resources
- 1 Router (Cisco 1941 with Cisco IOS software, release 15.4(3) universal image or comparable)
- 1 Switch (Cisco 2960 with Cisco IOS Release 15.0(2) lanbasek9 image or comparable)
- 1 PC (Windows 10) with terminal emulation program, such as Tera Term)
- DB-9 to RJ-45 console cable to configure the switch or router via the RJ-45 console port
- Mini-USB cable to configure the router via the USB console port if available
Part 1: Access a Cisco Device through the Serial Console Port
You will connect a PC to a Cisco switch or router using a console cable. This connection will allow you to access the command line interface (CLI) and display settings or configure the device
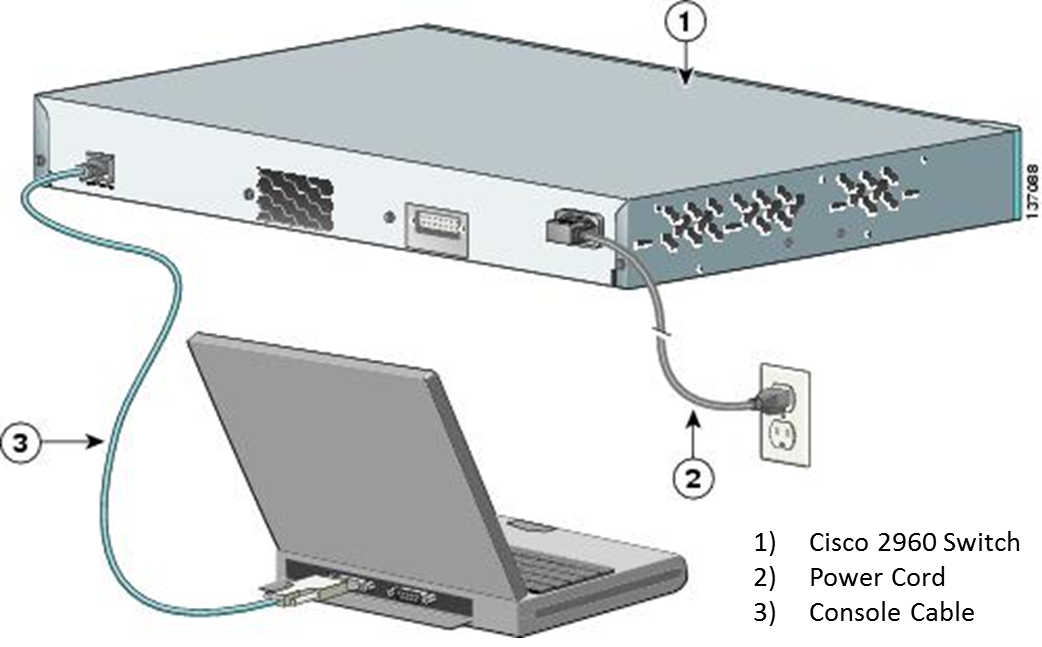
Step 1: Connect a Cisco device and computer using a console cable.
- Connect the console cable to the RJ-45 console port of the switch or router.
 If you are using a mini-USB console cable, connect it to mini-USB port of the device.
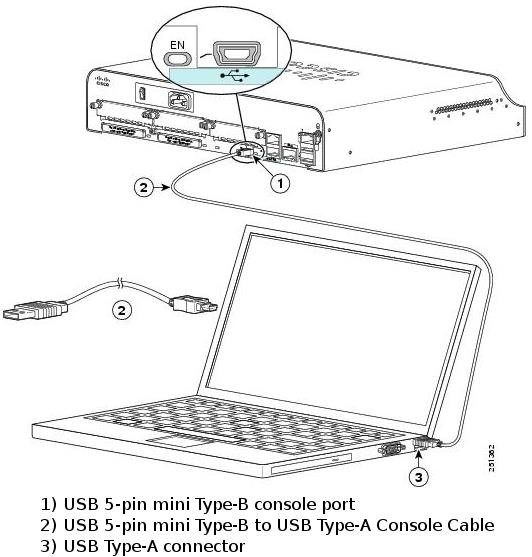
- Connect the other cable end to the serial COM port on the computer.
Note: Serial COM ports are no longer available on most computers today. A USB-to-DB9 adapter can be used with the console cable for console connection between the computer and a Cisco device. These USB-to-DB9 adapters can be purchased at any computer electronics store.
If using a USB-to-DB9 adapter to connect to the COM port, you may be required to install a driver for the adapter provided by the manufacturer on your computer.
Note: If you are using a mini-USB cable, you maybe prompted to install a driver. - Power up the Cisco device and computer if these devices are not already on.
Step 2: Configure Tera Term to establish a console session with the device.
Tera Term is a terminal emulation program. This program allows you to access the terminal output of the switch. It also allows you to configure the switch.
- Right-click Start. Enter Tera Term and select Tera Term in the results list.
Note: If the program is not installed on the system, Tera Term can be downloaded from the following link by selecting the latest Tera Term package release. Tera Term is open source free software.
https://en.osdn.jp/projects/ttssh2/releases/ - Click Serial.
When using the USB-to-Serial cable, select the COM port associated with Prolific USB-to-Serial Comm Port. In this example, COM4 is the serial port used by the computer.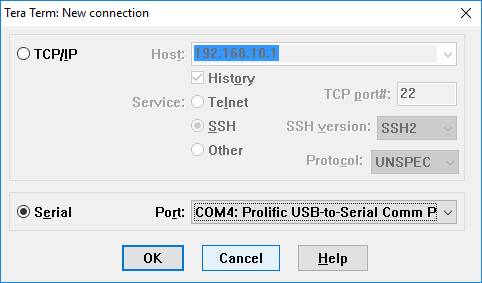 When using the mini-USB cable, select the COM port associated with the USB Serial Device. In this example, COM3 is the serial port used by the computer.
- Click OK to connect to the device.
Part 2: Erasing and Reloading the Cisco Device
For the majority of the labs in this course, it is necessary to start with an unconfigured router and switch. Using a device with an existing configuration may produce unpredictable results. The following instructions prepare a switch or router prior to performing the lab so that previous configuration options do not interfere. Instructions are provided for the 2960 series switches.
- Enter privileged EXEC mode by typing enable. If prompted for a password, refer to the Answers for assistance.
Switch> enable
or
Router> enable - If you are using a switch, remove the VLAN database information file. This file exists only if changes were made to the switch VLAN configurations.
Switch# delete vlan.dat
Delete filename [vlan.dat]? [Enter]
Delete flash:vlan.dat? [confirm] [Enter]
If there was no VLAN file, this message is displayed:
%Error deleting flash:vlan.dat (No such file or directory) - Remove the startup configuration file from NVRAM.
Switch# erase startup-config
or
Router# erase startup-config
The responding line prompt is:
Erasing the nvram filesystem will remove all files! Continue? [confirm] - Press Enter to confirm. The response should be:
Erase of nvram: complete - Restart the software using the reload command in privileged EXEC mode.
Switch# reload
or
Router# reload
The responding line prompt is:
System configuration has been modified. Save? [yes/no]: - Type n, and then press Enter. The responding line prompt is:
Proceed with reload? [confirm] [Enter]
The first line of the response is:
Reload requested by console.
After the device has reloaded, the line prompt is:
Would you like to enter the initial configuration dialog? [yes/no]: - Type n, and then press Enter. The responding line prompt is:
Press RETURN to get started! [Enter]