Last Updated on March 24, 2018 by Admin
10.2.1.7 Packet Tracer – Web and Email
From year to year, Cisco has updated many versions with difference questions. The latest version is version 6.0 in 2018. What is your version? It depends on your instructor creating your class. We recommend you to go thought all version if you are not clear. While you take online test with netacad.com, You may get random questions from all version. Each version have 1 to 10 different questions or more. After you review all questions, You should practice with our online test system by go to "Online Test" link below.
| Version 5.02 | Version 5.1 | Version 6.0 | Online Assessment |
| Chapter 10 Exam | Chapter 10 Exam | Chapter 10 Exam | Online Test |
| Next Chapter | |||
| Chapter 11 Exam | Chapter 11 Exam | Chapter 11 Exam | Online Test |
| Lab Activities | |||
| 10.2.1.7 Packet Tracer – Web and Email | |||
| 10.2.2.7 Packet Tracer – DNS and DHCP | |||
| 10.2.3.3 Packet Tracer – FTP | |||
| 10.3.1.2 Packet Tracer – Explore a Network | |||
| 10.3.1.3 Packet Tracer Multiuser – Tutorial – Client Side | |||
| 10.3.1.4 Packet Tracer Multiuser – Implement Services – Client Side | |||
Packet Tracer – Web and Email (Answer Version – Optional Packet Tracer)
Answer Note: Red font color or gray highlights indicate text that appears in the Answer copy only. Optional activities are designed to enhance understanding and/or to provide additional practice.
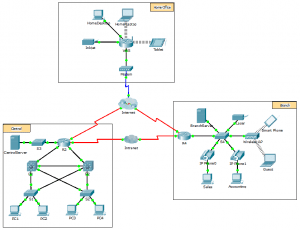
Topology

10.2.1.7 Packet Tracer – Web and Email
Objectives
Part 1: Configure and Verify Web Services
Part 2: Configure and Verify Email Services
Background
In this activity, you will configure web and email services using the simulated server in Packet Tracer. You will then configure clients to access the web and email services.
Note: Packet Tracer only simulates the process for configuring these services. Web and email software packages each have their own unique installation and configuration instructions.
Part 1: Configure and Verify Web Services
Step 1: Configure web services on CentralServer and BranchServer.
- Click CentralServer and click the Services tab > HTTP.
- Click On to enable HTTP and HTTP Secure (HTTPS).
- Optional. Personalize the HTML code.
- Repeat Step1a – 1c on BranchServer.
Step 2: Verify the web servers by accessing the web pages.
There are many endpoint devices in this network, but for the purposes of this step, use PC3.
- Click PC3 and click the Desktop tab > Web Browser.
- In the URL box, enter 10.10.10.2 as the IP address and click Go. The CentralServer website displays.
- In the URL box, enter 64.100.200.1 as the IP address and click Go. The BranchServer website displays.
- In the URL box, enter centralserver.pt.pka and click Go. The CentralServer website displays.
- In the URL box, enter branchserver.pt.pka and click Go. The BranchServer website displays.
- What protocol is translating the centralserver.pt.pka and branchserver.pt.pka names to IP addresses?
____________________________________________________________________________________
Domain Name Service (DNS)
Part 2: Configure and Verify Email Services on Servers
Step 1: Configure CentralServer to send (SMTP) and receive (POP3) Email.
- Click CentralServer, and then select the Services tab followed by the EMAIL button.
- Click On to enable the SMTP and POP3.
- Set the domain name to centralserver.pt.pka and click Set.
- Create a user named central-user with password cisco. Click + to add the user.
Step 2: Configure BranchServer to send (SMTP) and receive (POP3) Email.
- Click BranchServer and click the Services tab > EMAIL.
- Click On to enable SMTP and POP3.
- Set the domain name to branchserver.pt.pka and click Set.
- Create a user named branch-user with password cisco. Click + to add the user.
Step 3: Configure PC3 to use the CentralServer email service.
- Click PC3 and click the Desktop tab > E Mail.
- Enter the following values into their respective fields:
- Your Name: Central User
- Email Address: [email protected]
- Incoming Mail Server: 10.10.10.2
- Outgoing Mail Server: 10.10.10.2
- User Name: central-user
- Password: cisco
- Click Save. The Mail Browser window displays.
- Click Receive. If everything has been set up correctly on both the client and server, the Mail Browser window displays the Receive Mail Success message confirmation.
Step 4: Configure Sales to use the Email service of BranchServer.
- Click Sales and click the Desktop tab > E Mail.
- Enter the following values into their respective fields:
- Your Name: Branch User
- Email Address: [email protected]
- Incoming Mail Server: 172.16.0.3
- Outgoing Mail Server: 172.16.0.3
- User Name: branch-user
- Password: cisco
- Click Save. The Mail Browser window displays.
- Click Receive. If everything has been set up correctly on both the client and server, the Mail Browser window displays the Receive Mail Success message confirmation.
- The activity should be 100% complete. Do not close the Sales configuration window or the Mail Browser window.
Step 5: Send an Email from the Sales client and the PC3 client.
- From the Sales Mail Browser window, click Compose.
- Enter the following values into their respective fields:
- To: [email protected]
- Subject: Personalize the subject line.
- Email Body: Personalize the email.
- Click Send.
- Verify that PC3 received the email. Click PC3. If the Mail Browser window is closed, click E Mail.
- Click Receive. An email from Sales displays. Double-click the email.
- Click Reply, personalize a response, and click Send.
- Verify that Sales received the reply.
From year to year, Cisco has updated many versions with difference questions. The latest version is version 6.0 in 2018. What is your version? It depends on your instructor creating your class. We recommend you to go thought all version if you are not clear. While you take online test with netacad.com, You may get random questions from all version. Each version have 1 to 10 different questions or more. After you review all questions, You should practice with our online test system by go to "Online Test" link below.
| Version 5.02 | Version 5.1 | Version 6.0 | Online Assessment |
| Chapter 10 Exam | Chapter 10 Exam | Chapter 10 Exam | Online Test |
| Next Chapter | |||
| Chapter 11 Exam | Chapter 11 Exam | Chapter 11 Exam | Online Test |
| Lab Activities | |||
| 10.2.1.7 Packet Tracer – Web and Email | |||
| 10.2.2.7 Packet Tracer – DNS and DHCP | |||
| 10.2.3.3 Packet Tracer – FTP | |||
| 10.3.1.2 Packet Tracer – Explore a Network | |||
| 10.3.1.3 Packet Tracer Multiuser – Tutorial – Client Side | |||
| 10.3.1.4 Packet Tracer Multiuser – Implement Services – Client Side | |||