Last Updated on November 2, 2018 by Admin
8.1.2.10 Lab – Connect to a Router for the First Time Answers
Lab – Connect to a Router for the First Time (Answers Version)
Introduction
- In this lab, you will configure basic settings on a wireless router.
Recommended Equipment
- A computer with Windows installed
- An Ethernet NIC installed
- Wireless router
- Ethernet patch cable
Answers Note: You will need to provide router address settings, DHCP server settings, and a router access password for each router in the classroom.
Step 1: Connect the computer to the router.
- Ask the Answers for the following information that is used during the lab.
Answers Note: You will need to provide the student with the following information for the router:
IP address, subnet mask, DHCP start IP address and maximum number of users, router password, and router name#. Where # is a different number assigned to each router.
For example:
Router Address Information:
IP address: ____________________________________________
Example: 192.168.1.254
Subnet mask:_________________________________________
Example: 255.255.255.0
Router name:__________________________________________
Example: ITE
DHCP Server Setting Information:
Start IP address: ______________________________________
Example: 192.168.1.25
Maximum number of users:___________________________
Example: 10
Static DNS 1 (optional):_______________________________
Example: 64.7.99.178
Router Access:
Router Password:
Example: Network
Note: Only use configurations assigned by the Answers. - Plug in the power of the wireless router. Boot the computer and log in as an administrator.
- Connect the computer to one of the Ethernet ports on the wireless router with an Ethernet patch cable.
Note: If this is the first time connecting to the lab router, follow these instructions to set a network location. This will be explained later in the course. - In the Set Network Location window, select Public network.

8.1.2.10 Lab – Connect to a Router for the First Time Answers 01
- Click Close to accept the network location Public.

8.1.2.10 Lab – Connect to a Router for the First Time Answers 02
- Open a command prompt and type ipconfig /renew.
What is the default gateway for the computer?____________________________________________________________________________________
Answers may vary – 192.168.1.1
Step 2: Log in to the router.
- Open Internet Explorer. Type the IP address of your default gateway in the Address field, and then press Enter.

8.1.2.10 Lab – Connect to a Router for the First Time Answers 03
- In the Windows Security window, type admin in the Password: field then click OK.
Note: If this user name and password combination does not work, as your Answers or refer to the documentation of the router for the correct user name and password for your router.
8.1.2.10 Lab – Connect to a Router for the First Time Answers 04
- The Setup screen appears.

8.1.2.10 Lab – Connect to a Router for the First Time Answers 05
In the Internet Setup section, what is the Internet Connection Type assigned to the router?____________________________________________________________________________________
Answers will vary. - Make sure the Internet Connection Type is set to Automatic Configuration – DHCP.
- Locate the Network Setup section. Verify that the DHCP Server is enabled.

8.1.2.10 Lab – Connect to a Router for the First Time Answers 06
What is the Router IP address and the subnet mask?____________________________________________________________________________________
Answers will vary. In this example, the IP address is 192.168.0.1 and the subnet mask is 255.255.255.0.
Record the DHCP Server Settings:
Start IP Address: ______________________________________________________________
Answers will vary. In this example, the start IP address is 192.168.0.100.
Maximum Number:____________________________________________________________
Answers will vary. The maximum number is 50 in this example.
IP Address Range:_______________________________________________________________
Answers will vary. The IP address range is 192.168.0.100 – 149 in the example. - Enter the Router Address and DHCP Server Setting information provided by the Answers: IP Address, Subnet Mask, Start IP Address, and Maximum Number of Users.
- Click Save Settings.

8.1.2.10 Lab – Connect to a Router for the First Time Answers 07
- The router may need to reboot at this time. If necessary, reboot the router and log back in.
Step 3: Find the IP address information of the computer.
- Open a command prompt.
- Type ipconfig /all, and record the following information.
Computer IP information:
IP address:_______________________________________
Example: 192.168.1.25 to 34
Subnet mask:____________________________________
Example: 255.255.255.0
Gateway:________________________________________
Example: 192.168.1.254
DNS (optional):__________________________________
Example: 64.7.99.178 - Click Start > Control Panel > Network and Sharing Center > Change adapter settings.
Note: In Windows Vista, click Start > Control Panel > Network and Sharing Center > Manage network connections. - In the Network Connections window, right-click the correct Ethernet adapter and select Properties. Click Internet Protocol Version 4 (TCP/IPv4) and select Properties.
- Use the recorded information to configure the NIC with static IP information. Click OK, and click Close.

8.1.2.10 Lab – Connect to a Router for the First Time Answers 08
Step 4: Change QoS settings.
- Click the Applications& Gaming tab and then select QoS.
- Make sure WMM Support is enabled. Click Save Settings > Continue, if any changes were made.

8.1.2.10 Lab – Connect to a Router for the First Time Answers 09
Step 5: Change router password.
- Click the Administration tab and then select Management.
- Type Network in the Router Password: and Re-enter to confirm: fields.
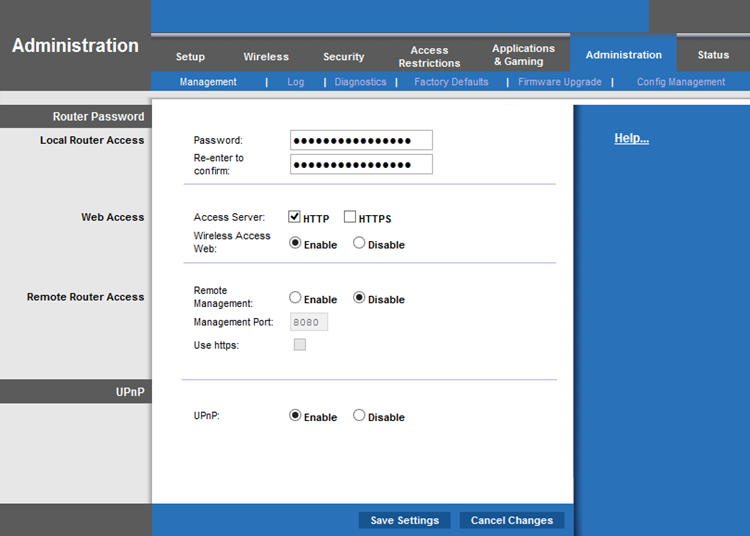
- Click Save Settings > Continue.
- Log back into the router using the new IP address and password.
What IP address did you enter into the URL field of the browser?
____________________________________________________________________________________
Answers will vary. (192.168.1.254)
What password did you use to access the router GUI?
____________________________________________________________________________________
Answers will vary. (Network)
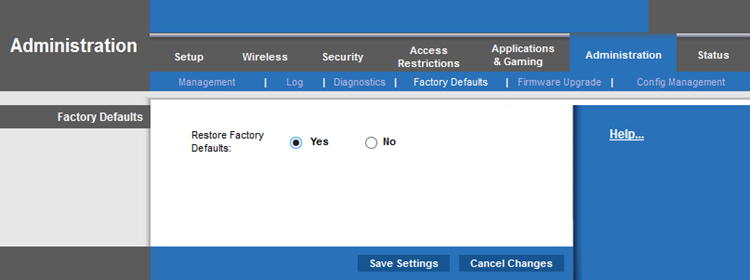
Step 6: Reset the router to the original configuration.
- Unless stated otherwise by the Answers, restore the router back to factory default if the option is available.
 If default restoration is not available, return the configurations to the following settings or settings provided by the Answers.
Router Address Information:
IP address: ……………………………….192.168.1.1
Subnet mask: …………………………..255.255.255.0
Router name: …………………………..Router
DHCP Server Setting Information:
Start IP address:………………………. 192.168.1.100
Maximum number of users:….. 50
Static DNS 1 (optional):…………… 0.0.0.0 or leave it blank
Router Access:
Router Password:……………………….. Admin - Navigate to the Internet Protocol Version 4 (TCP/IPv4) Properties window on the computer. Select Obtain an IP address automatically and Obtain DNS server address automatically. Click OK, and click Close.
- Close the browser, log off the computer, and turn off the router.