Last Updated on October 31, 2018 by Admin
6.1.2.5 Lab – Configure Browser Settings in Windows 7 and Vista Answers
Lab – Configure Browser Settings in Windows 7 and Vista (Answers Version)
Introduction
In this lab, you will configure browser settings in Microsoft Internet Explorer.
Recommended Equipment
- A computer with Windows 7 and Vista installed
- An Internet connection
Answers Note: This lab contains configuration examples from Microsoft Internet Explorer version 11. You will need to make the changes necessary if you are using a different version or browser in your classroom. If you do not allow students to access the Internet directly, perform this lab as a demonstration for the class.
Step 1: Setting Intenet Explorer as the default browser
- Choose Start > Search Programs and files in Windows 7 or Choose Start > Start Search in Windows Vista. Type www.cisco.com, and click the link http://www.cisco.com.

6.1.2.5 Lab – Configure Browser Settings in Windows 7 and Vista Answers 01
Which browser was used to open the web page?____________________________________________________________________________________
Answers may vary. Internet Explorer.
If your answer is not Internet Explorer, use the following steps to set Internet Explorer as your default browser. Otherwise, go to step b.- Choose Start > All Programs > Internet Explorer.
- Choose Tools > Internet options, and then click the Programs tab.

6.1.2.5 Lab – Configure Browser Settings in Windows 7 and Vista Answers 02
- Select Tell me if Internet Explorer is not the default web browser and then click OK. Close the browser.
- Choose Start > All Programs > Internet Explorer.
- Click Yes to make Internet Explorer the default browser.
- Click Tools (
 ) at the top right hand corner of the window > About Internet Explorer.

6.1.2.5 Lab – Configure Browser Settings in Windows 7 and Vista Answers 03
If desired, right-click the title bar and select Menu bar to add the menu to Internet Explorer. Click Help > About Internet Explorer.

6.1.2.5 Lab – Configure Browser Settings in Windows 7 and Vista Answers 04
Which version of Internet Explorer is installed on your computer?____________________________________________________________________________________
Answers may vary.
Step 2: Clear Temporary Internet Files
- Choose Tools > Internet options. Click the Settings in the Browsing history section in the General tab.

6.1.2.5 Lab – Configure Browser Settings in Windows 7 and Vista Answers 05
- In the Website Data Settings window, click View files in the Temporary Internet Files tab to list the temporary Internet files.
Note: In Windows Vista the window is called Temporary Internet Files and History Settings.
6.1.2.5 Lab – Configure Browser Settings in Windows 7 and Vista Answers 06
How many temporary Internet files were listed?____________________________________________________________________________________
Answers may vary. 12 - Close the Temporary Internet Files window.In the Temporary Internet Files tab or section, which setting is configured for Check for newer versions of stored pages?____________________________________________________________________________________Answers may vary. AutomaticallyIn the History tab or section, how many days is History set to store list of visited websites?____________________________________________________________________________________Answers may vary. 20
- Close the Website Data Settings or Temporary Internet Files and History Settings window.
- In the Internet Options window, click Delete… in the General tab to remove Internet browsing history.

6.1.2.5 Lab – Configure Browser Settings in Windows 7 and Vista Answers 07
Which options are available in the Delete Browsing History for deleting browsing history?________________________________________________________________________________________________________________________________________________________________________Preserve Favorites website data, Temporary Internet files and website files, Cookies and website data, History, Download History, Form data, Passwords, and Tracking Protection, ActiveX Filtering and Do Not Track.
- Uncheck all selected options except for Temporary Internet files. Click Delete to remove the temporary files. When completed, Internet Explorer displays the following message:

- Close all opened windows except for Internet Explorer.
Step 3: Clear Internet Browsing History
- Open Internet Explorer, if closed, and visit a few web sites using the same tab.
- Click the down arrow at the right end of the URL Address field to view previously visited sites.
 How many sites are listed in the drop-down box? ____________________________________________
Answers may vary. 6 - To clear the browser history, choose Tools > Internet options > Delete. Uncheck all selected options except for History. Click Delete.

- Close all open windows except for Internet Explorer.
- When completed, click the down arrow at the right end of the address field to view previously visited sites.
 How many sites are now found in the drop-down box for browsing history?
None.
Step 4: Configure the Security Settings
- Open Internet Explorer as necessary.
- Choose Tools > Internet Options, and then click the Security tab.
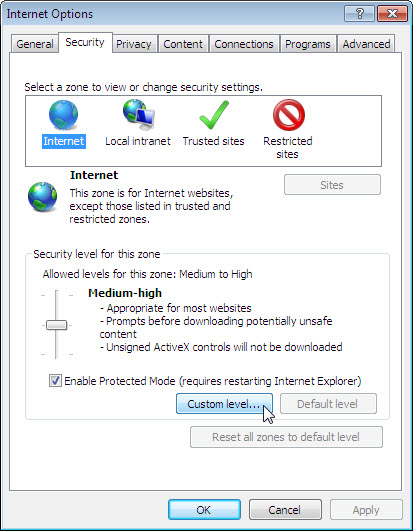
- Click each of the four zones and describe their security settings.
Internet: ___________________________________________________________________________________________________
For all Internet websites, except those listed in trusted and restricted zones.
Local intranet: _____________________________________________________________________________________________
For all websites that are found on your intranet.
Trusted sites: _______________________________________________________________________________________________
Websites that you trust not to damage your computer or your files.
Restricted sites: ____________________________________________________________________________________________
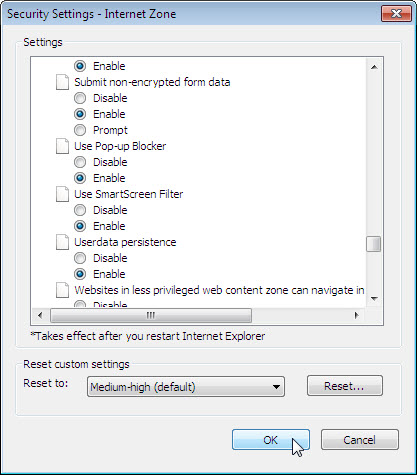
Websites that might damage your computer or files. - Click Custom level…. In this window, you can select the options in the list that you wish to change for a zone. Click Cancel to close this window.
Step 5: Configure Privacy Settings
- Open Internet Explorer if necessary. Click Tools > Internet options and select the Privacy tab. Click Advanced to open the Advanced Privacy Settings window.

- In the Advanced Privacy Settings window, click Override automatic cookie handling and change the setting for Third-party Cookies to Prompt.

- Click OK and close all open windows.
Reflection
Why would you want to clear temporary Internet files or Internet browsing history?
____________________________________________________________________________________
____________________________________________________________________________________
____________________________________________________________________________________
Answers will vary. The amount of temporary files and browser history could take up quite a bit of space on the hard drive with data from websites that you may never visit again. This data could be a privacy concern if the computer is shared because the data can reveal the websites visited in the past.