Last Updated on March 24, 2018 by Admin
7.2.4.9 Packet Tracer – Configuring IPv6 Addressing
From year to year, Cisco has updated many versions with difference questions. The latest version is version 6.0 in 2018. What is your version? It depends on your instructor creating your class. We recommend you to go thought all version if you are not clear. While you take online test with netacad.com, You may get random questions from all version. Each version have 1 to 10 different questions or more. After you review all questions, You should practice with our online test system by go to "Online Test" link below.
Packet Tracer – Configuring IPv6 Addressing (Answer Version)
Answer Note: Red font color or gray highlights indicate text that appears in the Answer copy only.
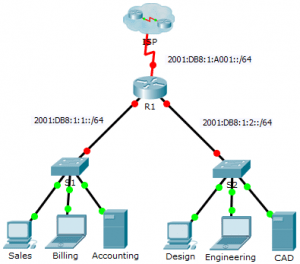
Topology

7.2.4.9 Packet Tracer – Configuring IPv6 Addressing
Addressing Table
| Device | Interface | IPv6 Address/Prefix | Default Gateway |
| R1 | G0/0 | 2001:DB8:1:1::1/64 | N/A |
| G0/1 | 2001:DB8:1:2::1/64 | N/A | |
| S0/0/0 | 2001:DB8:1:A001::2/64 | N/A | |
| Link-local | FE80::1 | N/A | |
| Sales | NIC | 2001:DB8:1:1::2/64 | FE80::1 |
| Billing | NIC | 2001:DB8:1:1::3/64 | FE80::1 |
| Accounting | NIC | 2001:DB8:1:1::4/64 | FE80::1 |
| Design | NIC | 2001:DB8:1:2::2/64 | FE80::1 |
| Engineering | NIC | 2001:DB8:1:2::3/64 | FE80::1 |
| CAD | NIC | 2001:DB8:1:2::4/64 | FE80::1 |
Objectives
Part 1: Configure IPv6 Addressing on the Router
Part 2: Configure IPv6 Addressing on Servers
Part 3: Configure IPv6 Addressing on Clients
Part 4: Test and Verify Network Connectivity
Background
In this activity, you will practice configuring IPv6 addresses on a router, servers, and clients. You will also practice verifying your IPv6 addressing implementation.
Part 1: Configure IPv6 Addressing on the Router
Step 1: Enable the router to forward IPv6 packets.
- Enter the ipv6 unicast-routing global configuration command. This command must be configured to enable the router to forward IPv6 packets. This command will be discussed in a later semester.
- R1(config)# ipv6 unicast-routing
Step 2: Configure IPv6 addressing on GigabitEthernet0/0.
- Click R1 and then the CLI tab. Press Enter.
- Enter privileged EXEC mode.
- Enter the commands necessary to transition to interface configuration mode for GigabitEthernet0/0.
- Configure the IPv6 address with the following command:
- R1(config-if)# ipv6 address 2001:DB8:1:1::1/64
- Configure the link-local IPv6 address with the following command:
- R1(config-if)# ipv6 address FE80::1 link-local
- Activate the interface.
Step 3: Configure IPv6 addressing on GigabitEthernet0/1.
- Enter the commands necessary to transition to interface configuration mode for GigabitEthernet0/1.
- Refer to the Addressing Table to obtain the correct IPv6 address.
- Configure the IPv6 address, the link-local address and activate the interface.
Step 4: Configure IPv6 addressing on Serial0/0/0.
- Enter the commands necessary to transition to interface configuration mode for Serial0/0/0.
- Refer to the Addressing Table to obtain the correct IPv6 address.
- Configure the IPv6 address, the link-local and activate the interface.
Part 2: Configure IPv6 Addressing on the Servers
Step 1: Configure IPv6 addressing on the Accounting Server.
- Click Accounting and click the Desktop tab > IP Configuration.
- Set the IPv6 Address to 2001:DB8:1:1::4 with a prefix of /64.
- Set the IPv6 Gateway to the link-local address, FE80::1.
Step 2: Configure IPv6 addressing on the CAD Server.
Repeat Steps 1a to 1c for the CAD server. Refer to the Addressing Table for the IPv6 address.
Part 3: Configure IPv6 Addressing on the Clients
Step 1: Configure IPv6 addressing on the Sales and Billing Clients.
- Click Billing and then select the Desktop tab followed by IP Configuration.
- Set the IPv6 Address to 2001:DB8:1:1::3 with a prefix of /64.
- Set the IPv6 Gateway to the link-local address, FE80::1.
- Repeat Steps 1a through 1c for Sales. Refer to the Addressing Table for the IPv6 address.
Step 2: Configure IPv6 Addressing on the Engineering and Design Clients.
- Click Engineering and then select the Desktop tab followed by IP Configuration.
- Set the IPv6 Address to 2001:DB8:1:2::3 with a prefix of /64.
- Set the IPv6 Gateway to the link-local address, FE80::1.
- Repeat Steps 1a through 1c for Design. Refer to the Addressing Table for the IPv6 address.
Part 4: Test and Verify Network Connectivity
Step 1: Open the server web pages from the clients.
- Click Sales and click the Desktop tab. Close the IP Configuration window, if necessary.
- Click Web Browser. Enter 2001:DB8:1:1::4 in the URL box and click Go. The Accounting website should appear.
- Enter 2001:DB8:1:2::4 in the URL box and click Go. The CAD website should appear.
- Repeat steps 1a through 1d for the rest of the clients.
Step 2: Ping the ISP.
- Open any client computer configuration window by clicking the icon.
- Click the Desktop tab > Command Prompt.
- Test connectivity to the ISP by entering the following command:
- PC> ping 2001:DB8:1:A001::1
- Repeat the ping command with other clients until full connectivity is verified.
From year to year, Cisco has updated many versions with difference questions. The latest version is version 6.0 in 2018. What is your version? It depends on your instructor creating your class. We recommend you to go thought all version if you are not clear. While you take online test with netacad.com, You may get random questions from all version. Each version have 1 to 10 different questions or more. After you review all questions, You should practice with our online test system by go to "Online Test" link below.