Last Updated on October 14, 2019 by Admin
6.1.3.10 Lab – Configure a Wireless Network Answers – ITE v7.0
Lab – Configure a Wireless Network (Answer Version)
Answer Note: Red font color or gray highlights indicate text that appears in the Answer copy only.
Introduction
In this lab, you will configure basic settings on a wireless router and connect a PC to router wirelessly.
Recommended Equipment
- A Windows computer with wired and wireless network cards installed
- Wireless router
- Ethernet patch cable
Note: All wireless settings in this lab are for a 2.4 GHz wireless connection. Follow the same steps for setting up a 5 GHz wireless connection or when setting up both 2.4 GHz and 5 GHz connections.
Answer Note: You will need to provide unique router address settings, DHCP server settings, SSID for each router in the classroom, and a router access password.
Instructions
Part 1: Log into the Wireless Router
Step 1: Connect the computer to the router.
- Ask the instructor for the following information that is used during the lab.
Answers Note: You will need to provide the student with the following information for the router:
IP address, subnet mask, DHCP start IP address and maximum number of users, router password, and router name#. Where # is a different number assigned to each router.
For example:
Router Address Information:
IP address:
Type your answers here.
Example: 192.168.50.1
Subnet mask:
Type your answers here.
Example: 255.255.255.0
Router name:
Type your answers here.
Example: ITE
DHCP Server Setting Information:
Start IP address:
Type your answers here.
Example: 192.168.50.100
Maximum number of users:
Type your answers here.
Example: 50
Default Router Access:
Router Username / Password:
Type your answers here.
Example: admin / password
Assigned SSID:
Your Assigned SSID:
Type your answers here.
The instructor assigns your router’s SSID.
Note: Only use configurations assigned by the instructor. - Plug in the power for the wireless router. Boot the computer and log in as an administrator.
- Connect the computer to one of the Ethernet ports on the wireless router with an Ethernet patch cable.
Note: If this is the first time connecting to the lab router, follow these instructions to set a network location. This will be explained later in the course. - If prompted by the Set Network Location window, select Public network. Click Close to accept the network location Public.
- Open a command prompt and type ipconfig to determine the IP address of the default gateway, which should be the IP address of your wireless router. If it is necessary to renew the IP address, enter ipconfig /all at the prompt.
Question:
What is the default gateway for the computer?
Type your answers here.
Answers may vary – 192.168.1.1
Step 2: Log in to the router.
- Open Microsoft Edge or other web browsers. Enter the IP address of your default gateway in the Address field, and then press Enter.
- In the Windows Security window, enter administrative user credentials provided by your Answer.
Part 2: Configure Basic Wireless Settings
In this lab, you will not be configuring the wireless router to the internet. You will configure the SSID or network name and security in the wireless settings, configure DHCP settings, and set a new administrative password.
Step 1: Configure SSID.
- Locate the wireless settings. In the SSID or network name field, enter your assigned SSID.
- Save the settings.
Step 2: Configure wireless security.
- Locate the wireless security settings.
- Select WPA2 security option. Select AES cipher and personal if available.
- Enter a passphrase or password as assigned by your Answer or use Cisco456! as an example.
- Save the settings.
Step 3: Configure DHCP settings.
- Locate the LAN settings.
- Configure router device name if available.
- Configure the router’s IP address and subnet mask as assigned by your Answer.
- Verify that the wireless router is used as the DHCP server.
- Configure the LAN information for your assigned subnet. If possible, you may be providing the starting and end IP addresses or the maximum number of IP addresses available for connecting hosts wirelessly.
- Save the settings.
- The router may need to reboot at this time. If necessary, reboot the router.
Step 4: Change the default administrative password.
- Locate the password settings for the administrative account.
- Provide the current password and the new password as assigned by your Answer or Cisco123!.
- Save the settings.
- Log into the wireless using the new credentials: admin / Cisco123! or the credentials that were assigned to you.
- At this time, you can disconnect the Ethernet cable if desired.
Part 3: Connect a Wireless Client
- Click Start, enter wireless. Select Change Wi-Fi Settings.
- In Wi-Fi settings window, select Show available networks.
- Select the configured SSID that you configured in a previous step.
- Enter the password or passphrase configured in a previous step.
- Open a command prompt. Type ipconfig and record the following information.
Computer IP information:
IP address:
Type your answers here.
Answers will vary. But the IP address should be within the range configured in the previous step.
Subnet mask:
Type your answers here.
Answers will vary. But the subnet mask should be within the range configured in the previous step.
Default Gateway:
Type your answers here.
Answers will vary. But the default gateway should be within the range configured in the previous step.
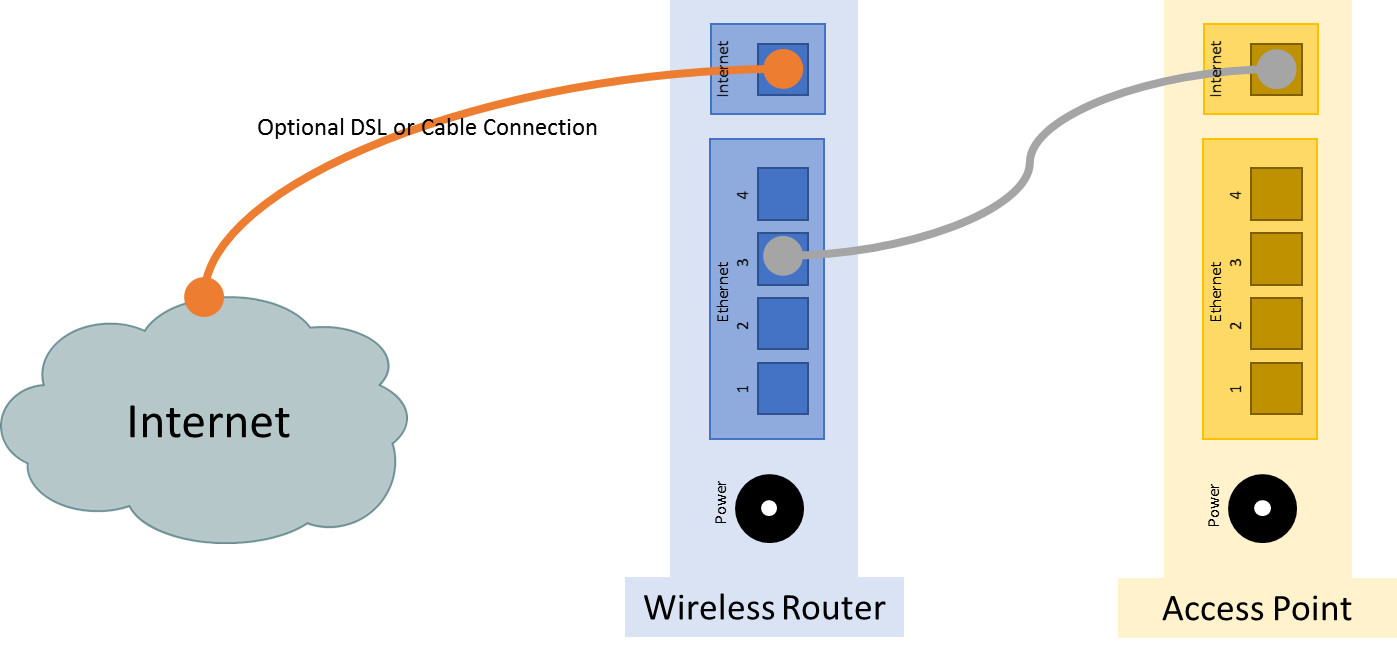
Part 4: Connect an Access Point (Optional)
In this part, you will add a wireless access point (AP) to the network. An AP is connected directly to a wireless router using an Ethernet cable. The purpose of an AP is to extend the wireless LAN where the wireless users cannot reach the wireless router otherwise.
In this part, you may need to partner with another group with a wireless router that can be converted to an access point. Or your Answer may also provide an access point. Unless instructed to connect the wireless router the internet, you do not need to connect the Internet port of the wireless router to a cable or DSL connection.
Note: If you are converting a wireless router to an AP, please follow the instructions provided by your Answer or manufacturer’s documentations.
Step 1: Connect the access point to the wireless network.
- Connect the wireless router via the Ethernet port. Navigate to the wireless router using a web browser using the IP address of the default gateway and log in as the administrator.
- To prevent interference, navigate to the wireless settings. Change the wireless channel from the default channel 1 to channel 6 or 11 on the wireless router. Save the new settings.
- Connect the Internet port of the access point to one of LAN ports on the existing wireless router.
Step 2: Configure access point wireless settings.
- In the web page of the wireless router, navigate to the LAN settings to determine the IP address of the access point. The IP address of the access point can be listed in the address reservation table or DHCP client list.
- In another web browser, navigate to the IP address of the access point.
- In the access point settings, navigate to the wireless settings and configure the AP with the same wireless SSID and security options as the wireless router. For example, ITE as the SSID and WPA2 Personal AES with Cisco456! as the passphrase.
- Verify that the wireless router and AP are not using the same wireless channels.
- Attempt to connect a wireless client to the wireless network.
Step 3: Turn off wireless radio on the wireless router.
After you have successfully connected to the wireless network, you will attempt to disable the wireless router radio, and a wireless client will attempt to connect to the wireless network through the AP.
Depending on the wireless router model, you maybe able to switch off the wireless radio using the on/off switch.
- Navigate to the wireless router using a web browser. If necessary, connect to the wireless router using a wired Ethernet connection.
- Navigate to the wireless settings, turn off the wireless router radio if available. The option to enable wireless radio may be in the advanced wireless settings.
- Save the settings.
- Attempt to connect a wireless client to the AP.
Part 5: Reset to the original configuration
Unless stated otherwise by the Answer, restore the router back to factory default if the option is available.
Note: Some wireless models have a reset button to reset the router to its default factory settings.
- Locate the Maintenance or System settings.
- Click the selection to revert to factory default settings.
- Provide your administrative credentials if prompted.
- Wait for your router to finish reboot before shutting down the wireless router.