Last Updated on July 29, 2020 by Admin
12.2.1.2 Lab – Passcode Locks Answers
Lab – Passcode Locks (Answers Version)
Answers Note: Red font color or gray highlights indicate text that appears in the Answers copy only.
Introduction
For most users, these Android or iOS devices are on the go with the users, and they are usually powered on all the time. If the device is lost or stolen, the passcode can prevent unauthorized access.
In this lab, you will set a passcode lock, change a passcode lock, and fail passcode authentication. You will also configure the device to use your fingerprints if it has biometric capability. Finally, you will remove the passcode and biometric locks
Recommended Equipment
- Android tablet or smartphone running Android version 7.0 or higher.
- iOS tablet or smartphone running iOS version 10.0 or higher
Answers Note: This lab must be completed by students even if the recommended equipment is not available. This lab is designed to provide students with familiarity of Android and iOS Features.
Answers Note: Due to the variety of Android and iOS devices and operating systems, some of the paths and locations of items may be different than those in this lab. Consult the support pages of the Android and iOS device used to determine the correct instructions for your device.
Instructions
Part 1: Passcode Lock on Android
Step 1: Configure Passcode Lock on an Android Device.
Answers Note: The device should have no passcode lock configured.
- With the device powered on, navigate to the Home screen.

- Go to Apps or All apps > touch Settings > touch Security. There are other names for Security depending on your device. The following are some samples: Lock screen and security, Lock screen, or Security & location. Security will be used throughout this lab.
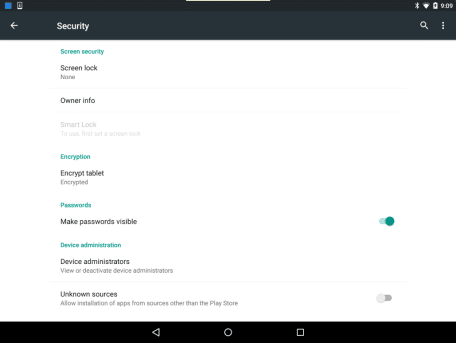
- Touch Screen lock or Screen lock type to choose a method for unlocking the screen.
Question:
What are the unlocking methods available on your device?
Answers varies depending on the Android versions and device / carrier model. Some of the methods are None, Swipe, Pattern, PIN, Password, or biometrics method that could include face, iris or fingerprints.
- Touch PIN to set a PIN for unlocking the screen.
- If the Encryption screen appears, Android asks if you want to use the PIN to encrypt the device. Touch No thanks and then touch CONTINUE to continue.
This is useful as the device’s filesystem will be encrypted based on PIN, making it unreadable until the PIN is provided. While this feature increases security, it is out of the scope of this lab.
- In the Choose your PIN or Set PIN screen, enter 123456. Touch CONTINUE.
- Type 123456 to confirm the PIN. Touch OK to confirm.
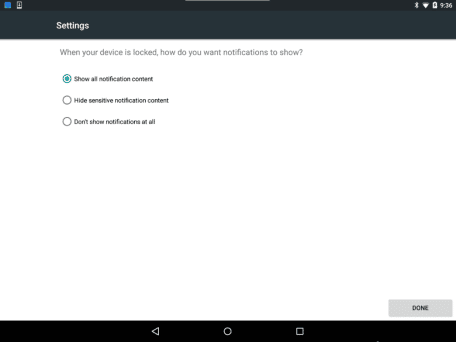
- Depending on your device, you may be prompted with other questions, such as Backup your PIN and Show all notification content. Consult your Answers as necessary.
- In the Secure Lock Settings, enter the PIN when prompted. Enable Lock instantly with power key.
Note: This option may not be available on device all models/versions.
Step 2: Use the PIN to Unlock the Screen.
- Press the Home button to return to the home screen.
- Press the Power button briefly to lock the screen. The device will go into sleep mode and the screen will go dark.
- Press the Power button briefly to wake up the device. Notice that the device will now require the PIN before allowing access. Enter 123456, the previously configured PIN. Touch the check mark or OK on the number pad.
Question:
What happens?
Answers may vary depending on what application was left running at the time the device was locked. The device unlocks and the home screen appears.
- Press the Power button briefly to lock the device.
- Press the Power button briefly to wake up the device. Swipe as necessary to see the prompt to enter the PIN.
- Enter 654321. Notice this is not the correct PIN that was configured on the device.
Question:
What happens?
The screen remains locked and a message indicates that an incorrect PIN has been entered.
- Enter the incorrect PINa few more times.
Question:
What happens?
You will receive a message indicating that you can try again in 30 seconds.
Repeatedly entering incorrect PINs is an indicator that someone is trying to guess the PIN. As a security measure, Android forces the user to wait 30 seconds before attempting another guess.
- Touch OK when 30 seconds have passed. Notice that Android will keep a countdown in the background.
- After 30 seconds, enter the correct PIN to unlock the device.
Step 3: Fingerprint Lock if available.
For some of the newer Android devices, fingerprints can be used to unlock the devices. In this step, you will configure the device so you can use your fingerprint to unlock the device. The PIN configured in a previous step is used as the backup unlock option in the event that the fingerprint scanner is not working or after a restart of the device.
- Navigate back to Security. (Apps > Settings)
- Locate the option that allows you to configure fingerprint to unlock the device. The options can be Nexus imprint, Pixel imprint, or Biometrics and security > Fingerprint. Provide the PIN when prompted.
Note: If the PIN is not configured in the previous step, you will be prompted to configure a backup unlock option, such as a PIN, passcode, or pattern.
- Verify that the fingerprint is allowed to unlock the device.
- Depending on your device, you can configure the device to require a PIN, password or pattern to start the device or how do you want notifications to show when the device is locked.
- Locate the imprint or fingerprint sensor on your device. Follow the directions provided by your device to capture and add your fingerprint. Touch done when finished adding fingerprints.
- Lock the phone and use your fingerprint to unlock your device.
Step 4: Face Lock if available.
On some of the newer Android devices, your face can be used to unlock the device. The PIN configured in a previous is the backup unlock method.
- Navigate back to Security or Security & Location. (Apps > Settings)
- Locate the option that allows you to configure your face to unlock the device. The options can be Biometric and security > Facial Recognition or Smart Lock > Trusted face. Enter the PIN when prompted.
- You will need to position your face in the on-screen circle and follow the on-screen instructions to register your face.
- Verify that the Face Lock is working, lock the device and attempt to unlock using your face. After the device recognizes your face, swipe to unlock the device.
Step 5: Clean up
- Navigate to Security and locate the options to configure fingerprints. Enter the PIN if prompted.
- Tap the fingerprints and select Delete or Remove.
- Remove the trusted face.
- Navigate back to Screen lock type. (Apps > Settings > Security)
Question:
What happens? Explain.
The user is asked to enter the PIN to prevent unauthorized users from changing or removing the PIN.
- Enter the correct PIN. Touch None.
- Press the power button briefly to lock the screen.
- Press the power button briefly to unlock the screen.
Question:
What happens?
The device wakes up without the need for a PIN. Also, the Screen lock type can also be accessed without a PIN.
- Navigate to Screen lock settings (Apps > Settings > Lock Screen). Disable Lock instantly with power key.
Question:
What are other security settings available on your device?
Answers will vary depending the Android version and model. Some of the examples are Lock automatically, Auto factory reset, and Lock network and security.
Part 2: Passcode Lock on iOS
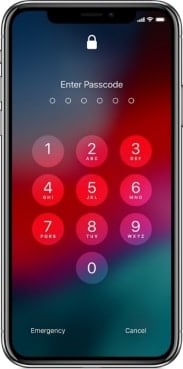
Step 1: Configure Passcode Lock on an iOS Device.
Answers Note: The device should have no passcode lock configured
- Turn on the device and navigate to Settings.
- Depending on your iOS version, touch Face ID & Passcode, Touch ID & Passcode, or Passcode.
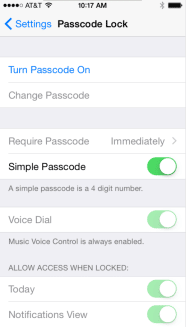
- Touch Turn Passcode On.
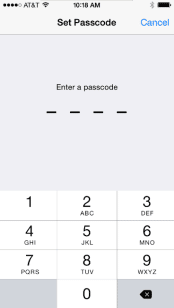
- Enter 123456 as the passcode if allowed by the device. Otherwise, use 1234 as the passcode for the rest of this lab.
- Re-enter 123456 to confirm the passcode.
- Verify that Require Passcode is set to Immediately.
Step 2: Use the Passcode to Unlock the Screen.
- Press the Power button briefly to lock the device.
- Slide to unlock the device. Enter the passcode 123456 when prompted.
Question:
What happens?
The screen is unlocked and the home screen appears.
- Press the Power button briefly to lock the device.
- Press the Power button briefly to unlock the device.
- Type 654321. Notice this is not the passcode configured in the device.
- Touch OK. What happens?
Question:
What happens?
The device vibrates, indicating a wrong PIN was provided; The screen remains locked.
- Enter the incorrect PIN 5 more times.
Question:
What happens?
A message iPhone is Disabled, try again in 1 minute is displayed.
- After 1 minute, enter the correct passcode.
Step 3: Configure Touch ID.
If your device supports Touch ID, you can use your fingerprint to unlock the device. Note: A passcode needs to be configured prior to configuring Touch ID.
- Touch Settings > tap Touch ID & Passcode. Enter the passcode when prompted.
- Touch Add a Fingerprint. Follow the directions provided by the device. Touch the Home button as you hold the device normally.
- Lock the device and verify that you can unlock the device using fingerprints.
Step 4: Configure Face ID.
If the iOS device supports Face ID, you can use facial recognition, rather than a password to unlock your device. A passcode configured in a previous step is necessary to complete the following exercise.
- On the iPhone, tap Settings > Face ID & Passcode. If prompted, enter your passcode.
- Tap Set Up Face ID, then position your face in front of your device.
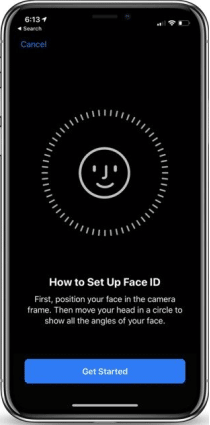
- Touch Get Started, look straight into your iPhone. Make sure to place your face in the circle at the center of the screen.
- Slowly move your head to complete the circle. This ensures that your face is scanned from all angles. When you finish the first Face ID scan, tap Continue. Follow the on-screen instructions.
- Touch Done when the setup is complete.
- Lock your device as necessary.
- Hold your device in portrait orientation. Make sure that nothing is covering the camera.
- Look briefly at the screen. The lock icon should change from locked to unlocked.
- As soon as the lock icon changes, swipe from the bottom of the screen to unlock the device.
Step 5: Clean up.
- Go to Settings > Passcode, Touch ID & Passcode, or Face ID & Passcode.
Question:
What happens? Explain.
The user is asked to enter the passcode. To prevent unauthorized users from changing or removing the passcode.
- Type the correct PIN when prompted.
- In the Face ID & Passcode screen, touch Reset Face ID and as necessary, touch Turn Passcode Off.
In the Touch ID & Passcode screen, remove the fingerprints and touch Turn Passcode Off as necessary.
In the Passcode Lock window, touch Turn Passcode Off.
- Press the Power button briefly to lock the device.
- Press the Power button briefly to unlock the device.
Question:
What happens?
The settings screen is displayed without entering a passcode.