Last Updated on July 29, 2020 by Admin
11.4.3.2 Lab – Disk CLI Commands Answers
Lab – Disk CLI Commands (Answers Version)
Answers Note: Red font color or gray highlights indicate text that appears in the Answers copy only.
Introduction
In this lab, you will work with disk CLI commands.
Required Resources
- A Windows PC
- An additional partition with an NTFS file system
Instructions
Part 1: The chkdsk Command Options
In this part, you will explore the Windows command that allow you to scan and repair disks.
Step 1: Explore the chkdsk command
- Open a command prompt.
- Open the help page the command chkdsk. Enter help chkdsk or chkdsk /? at the prompt to answer the following questions:
Questions:
What is the option to fix errors on the drive?
/F
What is the option to force the volume to dismount first if necessary?
/X
What is the option to locate bad sectors and recover readable information?
/R
- Enter the chkdsk command to check the C:\ drive with the options from the questions in the previous step.
Question:
What happened? Explain.
Access was denied because you do not have sufficient privileges.
Step 2: Use the chkdsk command options.
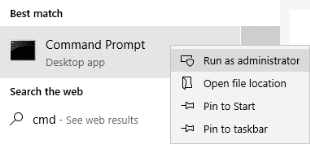
- Open a Command Prompt window with elevated privileges. Click Start and search for Command Prompt. Within the search results, right-click Command Prompt and select Run as administrator.
- In the Command Prompt window with elevated privileges, enter the command chkdsk C: /F /X /R to check the status of this drive. Enter y when prompted. Note the change in the prompt.
C:\Windows\system32> chkdsk C: /F /X /R
The type of the file system is NTFS.
Cannot lock current drive.
Chkdsk cannot run because the volume is in use by another
process. Would you like to schedule this volume to be
checked the next time the system restarts? (Y/N) y
This volume will be checked the next time the system restarts.
Note that the volume will be checked when the system restarts that next time because the volume is in use and it cannot be checked at this time.
Question:
What is the file system of the drive?
Answers will vary. The common file systems available in Windows are FAT, FAT32, and NTFS.
- A second partition was created in a previous lab. You can perform the chkdsk command on the second partition. The I: drive will be used in this example.
C:\Windows\system32> chkdsk I: /F /X /R
The type of the file system is NTFS.
Volume label is ITEINFO.
Stage 1: Examining basic file system structure …
256 file records processed.
File verification completed.
0 large file records processed.
0 bad file records processed.
<some output omitted>
Part 2: Create a new partition using DiskPart
In this part, you will shrink the second partition on the hard drive and create a third partition.
Note: Please back up any data from the drives before proceeding in this part. Because a new partition will be created by shrinking a volume and the new partition will be formatted. All data will be erased during the formatting process.
Step 1: List the disks, partitions, and volume.
- Using a command prompt with elevated privilege, enter diskpart at the prompt.
C:\Windows\system32> diskpart
Microsoft DiskPart version 10.0.17763.1
Copyright (C) Microsoft Corporation.
On computer: DESKTOP-PUU52R2
DISKPART>
- Notice the prompt indicated that you are in the diskpart utility. Enter help at the DISKPART> prompt to list the available commands within the diskpart utility. You can also use the help command anytime while you are in the diskpart utility. For example, enter help list disk at the prompt to view more information about the list disk command.
DISKPART> help list disk
Displays a list of disks.
Syntax: LIST DISK
Displays a list of disks and information about them, such as their
size, amount of available free space, whether the disk is a basic
or dynamic disk, and whether the disk uses the master boot record
(MBR) or GUID partition table (GPT) partition style. The disk marked
with an asterisk (*) has focus.
- Enter list disk at the DISKPART> prompt to list all the disk in the PC.
DISKPART> list disk
Disk ### Status Size Free Dyn Gpt
——– ————- ——- ——- — —
Disk 0 Online 50 GB 1024 KB
Disk 1 Online 5120 MB 1024 KB
Question:
Enter list partition to list all the partitions on the disk. How partitions are on the disk?
Answer may vary.
- Enter list partition command to list the partitions on the disk. Note: If you only have 1 disk, the disk is selected by default. If you have more than 1 disk in your PC as listed in the list disk command, you will need to select the desired disk. If you are interested in disk 0, enter select disk 0.
DISKPART> select disk 0
Disk 0 is now the selected disk.
- Enter list partition to list all the partition on the selected disk.
DISKPART> list partition
Partition ### Type Size Offset
————- —————- ——- ——-
Partition 1 Primary 549 MB 1024 KB
Partition 2 Primary 47 GB 550 MB
Partition 3 Primary 2047 MB 47 GB
- Enter list volume to list all the volumes on the computer. This will include the volumes on all the disks.
DISKPART> list volume
Volume ### Ltr Label Fs Type Size Status Info
———- — ———– —– ———- ——- ——— ——–
Volume 0 E CD-ROM 0 B No Media
Volume 1 System Rese NTFS Partition 549 MB Healthy System
Volume 2 C NTFS Partition 47 GB Healthy Boot
Volume 3 I ITEINFO NTFS Partition 2048 MB Healthy
Volume 4 D SecondDisk NTFS Partition 5117 MB Healthy
- Select the volume that will be used to create a new partition in the next step.
DISKPART> select volume 3
Volume 3 is the selected volume.
Step 2: Shrink a volume.
- Review the shrink command. Enter help shrink at the DISKPART prompt.
DISKPART> help shrink
Reduces the size of the volume with focus by the specified amount. Makes
free disk space available from unused space at the end of the volume.
Syntax: SHRINK [DESIRED=<N>] [MINIMUM=<N>] [NOWAIT] [NOERR]
SHRINK QUERYMAX [NOERR]
<some output omitted>
Question:
What option is used to determine the maximum number of bytes that the volume can be shrink by?
QUERYMAX
- Use the shrink command with the option querymax to determine the maximum number of bytes that the volume can be shrink by.
Question:
What is the maximum number of reclaimable bytes?
Answer will vary.
- Enter shrink desired=500 to reduce the size of volume by 500 megabytes.
DISKPART> shrink desired=500
The maximum number of reclaimable bytes is: 500 MB
Step 3: Create a new partition.
In the previous step, you have create 973 MB free space on the disk. In this step, you will create a primary partition with 500 MB with an NTFS file system.
- Enter create partition primary at the DISKPART prompt.
DISKPART> create partition primary
DiskPart succeeded in creating the specified partition.
Note: If there are already 3 primary partitions, you will need to create logical partition, instead of primary partitions.
DISKPART> create partition extended
DISKPART> create partition logical
- List the partition to verify that you have created a new partition. Notice the asterisk (*) next to partition 4 to indicate the partition is currently selected.
DISKPART> list partition
Partition ### Type Size Offset
————- —————- ——- ——-
Partition 1 Primary 549 MB 1024 KB
Partition 2 Primary 47 GB 550 MB
Partition 3 Primary 1548 MB 47 GB
* Partition 4 Primary 501 MB 49 GB
- List the volumes to verify that a new volume was created and is automatically selected. Note the file system is listed as RAW.
DISKPART> list volume
Volume ### Ltr Label Fs Type Size Status Info
———- — ———– —– ———- ——- ——— ——–
Volume 0 E CD-ROM 0 B No Media
Volume 1 System Rese NTFS Partition 549 MB Healthy System
Volume 2 C NTFS Partition 47 GB Healthy Boot
Volume 3 I ITEINFO NTFS Partition 1548 MB Healthy
Volume 4 D SecondDisk NTFS Partition 5117 MB Healthy
* Volume 5 RAW Partition 501 MB Healthy
- The new volume needs to be formatted with an appropriate file system before it can be used. The new volume will be format as NTFS and it will be labeled as new.
DISKPART> format fs=ntfs label=new
100 percent completed
DiskPart successfully formatted the volume.
- The new volume will be assigned as drive letter w.
DISKPART> assign letter=w
DiskPart successfully assigned the drive letter or mount point.
- List the volume to verify the new modification.
DISKPART> list volume
Volume ### Ltr Label Fs Type Size Status Info
———- — ———– —– ———- ——- ——— ——–
Volume 0 E CD-ROM 0 B No Media
Volume 1 System Rese NTFS Partition 549 MB Healthy System
Volume 2 C NTFS Partition 47 GB Healthy Boot
Volume 3 I ITEINFO NTFS Partition 1548 MB Healthy
Volume 4 D SecondDisk NTFS Partition 5117 MB Healthy
* Volume 5 W new NTFS Partition 501 MB Healthy
- Enter exit at the DISKPART> to exit the DiskPart utility.
Step 4: Format the new volume as a FAT file system.
Formatting can also be done outside of the DiskPart utility.
- In an elevated command prompt, enter the format command to reformat w: to use an FAT32 file system. When prompted, enter new as the current volume label. Enter the NewVol as the new volume label.
C:\Windows\system32> format /fs:fat32 w:
The type of the file system is NTFS.
The new file system is FAT32.
Enter current volume label for drive W: new
WARNING, ALL DATA ON NON-REMOVABLE DISK
DRIVE W: WILL BE LOST!
Proceed with Format (Y/N)? y
Formatting 500.0 MB
Initializing the File Allocation Table (FAT)…
Volume label (11 characters, ENTER for none)? NewVol
Format complete.
496.0 MB total disk space.
496.0 MB are available.
4,096 bytes in each allocation unit.
126,975 allocation units available on disk.
32 bits in each FAT entry.
Volume Serial Number is 90C2-A65F
- Navigate to the newly created W: drive and create folders and files, if desired.
Part 3: Clean up
After you have verified that the new partition is working, you will delete the newly created volume and the free space will rejoin the original second partition.
- At the elevated command prompt, enter diskpart to return to the DiskPart utitliy.
- List all the disks for the computer by issuing the list disk command.
DISKPART> list disk
Disk ### Status Size Free Dyn Gpt
——– ————- ——- ——- — —
Disk 0 Online 50 GB 0 B
Disk 1 Online 5120 MB 1024 KB
- Select the appropriate disk that has the newly created volume.
DISKPART> select disk 0
Disk 0 is now the selected disk.
- List all the volume for the computer by using the list volume command.
DISKPART> list volume
Volume ### Ltr Label Fs Type Size Status Info
———- — ———– —– ———- ——- ——— ——–
Volume 0 E CD-ROM 0 B No Media
Volume 1 System Rese NTFS Partition 549 MB Healthy System
Volume 2 C NTFS Partition 47 GB Healthy Boot
Volume 3 I ITE NTFS Partition 1148 MB Healthy
Volume 4 W NEWVOL FAT32 Partition 500 MB Healthy
Volume 5 D SecondDisk NTFS Partition 5117 MB Healthy
- Select the volume that should be deleted.
DISKPART> select volume 4
Volume 4 is the selected volume.
- Delete the volume using the delete volume command.
DISKPART> delete volume
DiskPart successfully deleted the volume.
- Verify that the volume has been deleted by using the list volume command.
DISKPART> list volume
Volume ### Ltr Label Fs Type Size Status Info
———- — ———– —– ———- ——- ——— ——–
Volume 0 E CD-ROM 0 B No Media
Volume 1 System Rese NTFS Partition 549 MB Healthy System
Volume 2 C NTFS Partition 47 GB Healthy Boot
Volume 3 I ITE NTFS Partition 1148 MB Healthy
Volume 4 D SecondDisk NTFS Partition 5117 MB Healthy
- Now you can recover the free space from the deleted volume 4 by extending volume 3 to include the free space. Select volume 3 and use the extend command to extend volume 3.
DISKPART> select volume 3
Volume 3 is the selected volume.
DISKPART> extend
DiskPart successfully extended the volume.
- Use the list partition command to verify that the newly created partition was deleted and the shrunk partition is back to the original capacity.
DISKPART> list partition
Partition ### Type Size Offset
————- —————- ——- ——-
Partition 1 Primary 549 MB 1024 KB
Partition 2 Primary 47 GB 550 MB
Partition 3 Primary 2049 MB 47 GB
- Enter exit at the DISKPART> to exit the DiskPart utility.