Last Updated on February 1, 2019 by Admin
11.2.4.7 Lab – Examining Telnet and SSH in Wireshark Answers
Lab – Examining Telnet and SSH in Wireshark (Answers Version – Optional Lab)
Answers Note: Red font color or gray highlights indicate text that appears in the instructor copy only. Optional activities are designed to enhance understanding or to provide additional practice or to do both.
Topology

Addressing Table
| Device | Interface | IP Address | Subnet Mask | Default Gateway |
| R1 | G0/1 | 192.168.1.1 | 255.255.255.0 | N/A |
| PC-A | NIC | 192.168.1.3 | 255.255.255.0 | 192.168.1.1 |
Objectives
Part 1: Configure the Devices for SSH Access
Part 2: Examine a Telnet Session with Wireshark
Part 3: Examine a SSH Session with Wireshark
Background / Scenario
In this lab, you will configure a router to accept SSH connectivity, and use Wireshark to capture and view Telnet and SSH sessions. This will demonstrate the importance of encryption with SSH.
Note: The routers used with CCNA hands-on labs are Cisco 1941 Integrated Services Routers (ISRs) with Cisco IOS Release 15.2(4)M3 (universalk9 image). The switches used are Cisco Catalyst 2960s with Cisco IOS Release 15.0(2) (lanbasek9 image). Other routers, switches, and Cisco IOS versions can be used. Depending on the model and Cisco IOS version, the commands available and the output produced might vary from what is shown in the labs. Refer to the Router Interface Summary Table at the end of this lab for the correct interface identifiers.
Note: Make sure that the routers and switches have been erased and have no startup configurations. If you are unsure, contact your instructor.
Answers Note: Refer to the Answers Lab Manual for the procedures to initialize and reload devices.
Required Resources
- 1 Router (Cisco 1941 with Cisco IOS Release 15.2(4)M3 universal image or comparable)
- 1 PC (Windows 7, 8, or 10 with terminal emulation program, such as Tera Term, and Wireshark installed)
- Console cables to configure the Cisco IOS devices via the console ports
- Ethernet cables as shown in the topology
Part 1: Configure the Devices for SSH Access
In Part 1, you will set up the network topology and configure basic settings, such as the interface IP addresses, device access, and passwords on the router.
Step 1: Cable the network as shown in the topology.
Step 2: Initialize and reload the router.
Step 3: Configure the basic settings on the router.
- Console into the router and enable privileged EXEC mode.
- Enter configuration mode.
- Configure the device name as listed in the Addressing Table.
- Disable DNS lookup to prevent the router from attempting to translate incorrectly entered commands as though they were host names.
- Assign class as the privileged EXEC encrypted password.
- Assign cisco as the console password and enable login.
- Assign cisco as the VTY password and enable login.
- Encrypt the plain text passwords.
- Create a banner that will warn anyone accessing the device that unauthorized access is prohibited.
- Configure and activate the G0/1 interface using the information contained in the Addressing Table.
Step 4: Configure R1 for SSH access.
- Configure the domain for the device.
R1(config)# ip domain-name ccna-lab.com - Configure the encryption key method.
R1(config)# crypto key generate rsa modulus 1024 - Configure a local database username.
R1(config)# username admin privilege 15 secret adminpass - Enable Telnet and SSH on the VTY lines.
R1(config)# line vty 0 4
R1(config-line)# transport input telnet ssh - Change the login method to use the local database for user verification.
R1(config-line)# login local
R1(config-line)# end
Step 5: Save the running configuration to the startup configuration file.
Step 6: Configure PC-A.
- Configure PC-A with an IP address and subnet mask.
- Configure a default gateway for PC-A.
Step 7: Verify network connectivity.
Ping R1 from PC-A. If the ping fails, troubleshoot the connection.
Part 2: Examine a Telnet Session with Wireshark
In Part 2, you will use Wireshark to capture and view the transmitted data of a Telnet session on the router. You will use Tera Term to telnet to R1, sign in, and then issue the show run command on the router.
Note: If a Telnet/SSH client software package is not installed on your PC, you must install one before continuing. Two popular freeware Telnet/SSH packages are Tera Term (http://download.cnet.com/Tera-Term/3000-20432_4-75766675.html) and PuTTY (www.putty.org).
Note: Telnet is not available from the command prompt in Windows 7, by default. To enable Telnet for use in the command prompt window, click Start > Control Panel > Programs > Programs and Features > Turn Windows features on or off. Click the Telnet Client check box, and then click OK.
Step 1: Capture data.
- Start Wireshark.
- Start capturing data on the LAN interface.
Note: If you are unable to start the capture on the LAN interface, you may need to open Wireshark using the Run as Administrator option.
Step 2: Start a Telnet session to the router.
- Open Tera Term and select the Telnet Service radio button and in the Host field, enter 192.168.1.1.
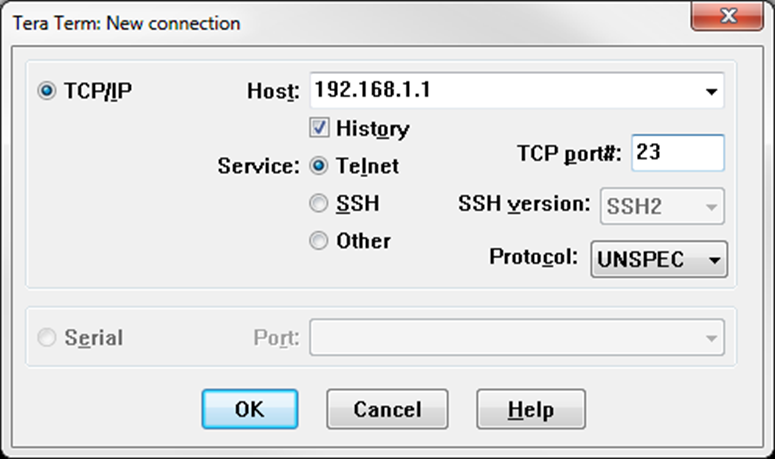 What is the default TCP port for Telnet sessions? _________________ Port 23
 - At the Username: prompt, enter admin and at the Password: prompt, enter adminpass. These prompts are generated because you configured the VTY lines to use the local database with the login local command.
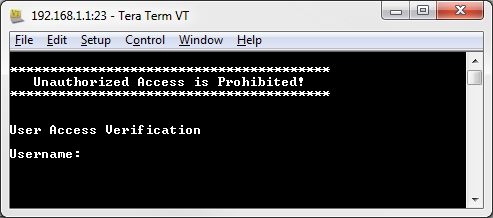
- Issue the show run command.
R1# show run - Enter exit to exit the Telnet session and out of Tera Term.
R1# exit
Step 3: Stop the Wireshark capture.
Step 4: Apply a Telnet filter on the Wireshark capture data.

Step 5: Use the Follow TCP Stream feature in Wireshark to view the Telnet session.
- Right-click one of the Telnet lines in the Packet list section of Wireshark, and from the drop-down list, select Follow TCP Stream.
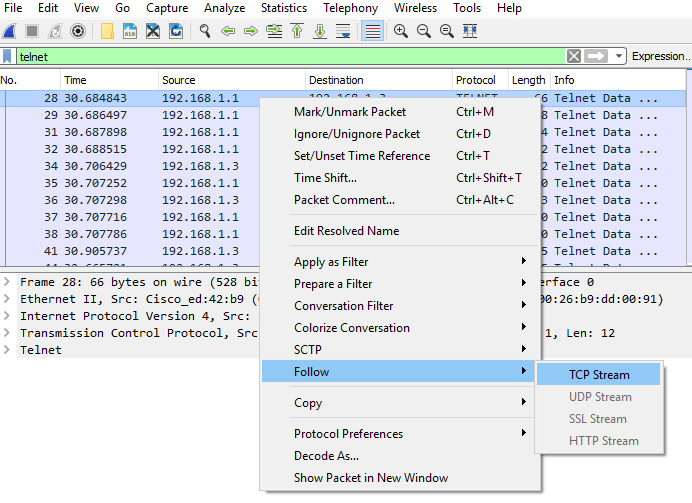
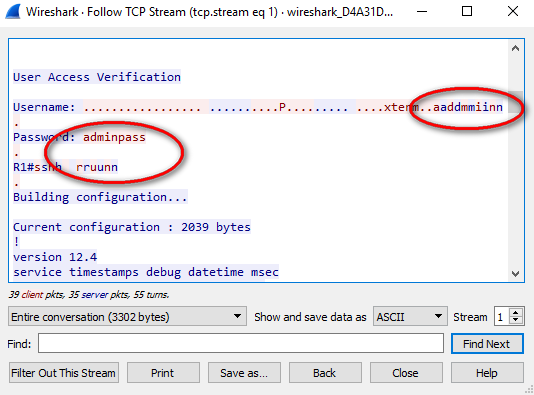
- The Follow TCP Stream window displays the data for your Telnet session with the router. The entire session is displayed in clear text, including your password. Notice that the username and show run command that you entered are displayed with duplicate characters. This is caused by the echo setting in Telnet to allow you to view the characters that you type on the screen.
- After you have finished reviewing your Telnet session in the Follow TCP Stream window, click Close.
Part 3: Examine an SSH Session with Wireshark
In Part 4, you will use the Tera Term software to establish an SSH session with the router. Wireshark will be used to capture and view the data of this SSH session.
Step 1: Open Wireshark and start capturing data on the LAN interface.
Step 2: Start an SSH session on the router.
- Open Tera Term and enter the G0/1 interface IP address of R1 in the Host: field of the Tera Term: New Connection window. Ensure that the SSH radio button is selected and then click OK to connect to the router.
 What is the default TCP port used for SSH sessions? __________________ Port 22
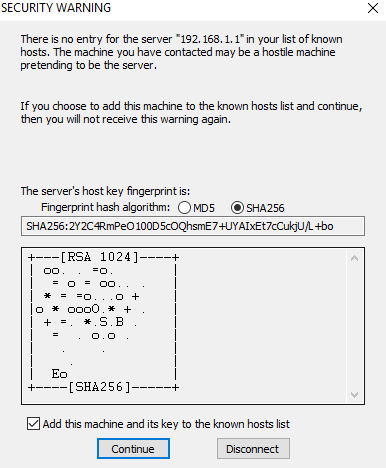
 - The first time you establish an SSH session to a device, a SECURITY WARNING is generated to let you know that you have not connected to this device before. This message is part of the authentication process. Read the security warning and click Continue.
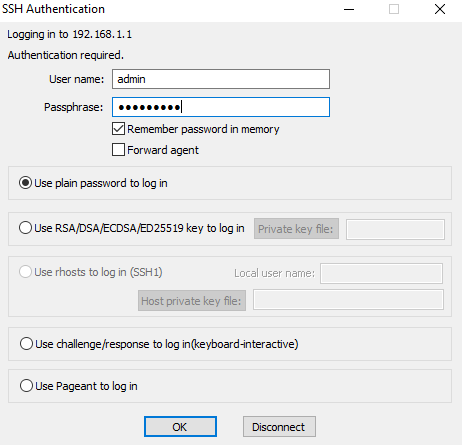
- In the SSH Authentication window, enter admin for the username and adminpass for the passphrase. Click OK to sign into the router.
- You have established an SSH session on the router. The Tera Term software looks very similar to a command window. At the command prompt, issue the show run command.
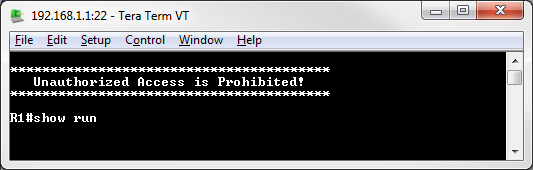
- Exit the SSH session by issuing the exit command.
R1# exit
Step 3: Stop the Wireshark capture.
Step 4: Apply an SSH filter on the Wireshark Capture data.

Step 5: Use the Follow TCP Stream feature in Wireshark to view the SSH session.
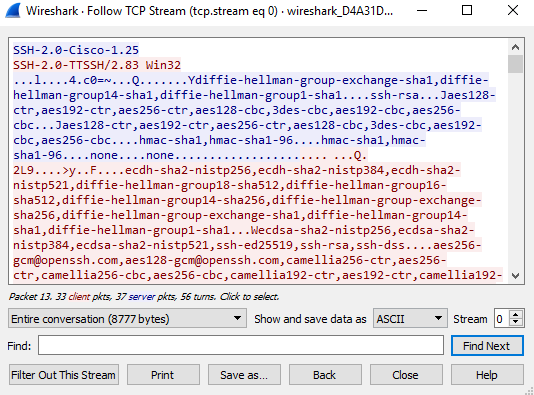
- Right-click one of the SSHv2 lines in the Packet list section of Wireshark, and in the drop-down list, select the Follow TCP Stream option.
- Examine the Follow TCP Stream window of your SSH session. The data has been encrypted and is unreadable. Compare the data in your SSH session to the data of your Telnet session.
 Why is SSH preferred over Telnet for remote connections?________________________________________________________________________________________________________________________________________________________________________________________________________________________________________________________________________________________________________________________________________________
Answers may vary.
Similar to Telnet, SSH is used to access and execute commands on a remote system. However, the SSH protocol allows users to communicate with remote systems securely by encrypting the communications. This prevents any sensitive information, such as usernames and passwords, from being captured during the transmission.
By using public-key cryptography to support communication between remote computers, SSH eliminates the need for initial private key exchange between the communicating parties. With SSH, the private key is never sent, as it uses a pair of keys (public and private) for encryption. Messages encrypted with a public key can only be decrypted with the corresponding private key. Because the private key never leaves the endpoints, the system is inherently secure.
When a user establishes an SSH connection for the first time, the SSH client program exchanges the public keys. The user is trusting the security of the network during the key exchange. When the user clicks Continue in the SSH client, the user is accepting the remote system into the list of known hosts. - After examining your SSH session, click Close.
- Close Wireshark.
Reflection
How would you provide multiple users, each with his or her own username, access to a network device?
_____________________________________________________________________________________________________________________________________________________________________________________________________________________________________________________________________
Answers may vary. You would add each user username and password to the local database via the username command. It is also possible to use a RADIUS or TACACS server, but this has not been covered yet.
Router Interface Summary Table
| Router Interface Summary | ||||
| Router Model | Ethernet Interface #1 | Ethernet Interface #2 | Serial Interface #1 | Serial Interface #2 |
| 1800 | Fast Ethernet 0/0 (F0/0) | Fast Ethernet 0/1 (F0/1) | Serial 0/0/0 (S0/0/0) | Serial 0/0/1 (S0/0/1) |
| 1900 | Gigabit Ethernet 0/0 (G0/0) | Gigabit Ethernet 0/1 (G0/1) | Serial 0/0/0 (S0/0/0) | Serial 0/0/1 (S0/0/1) |
| 2801 | Fast Ethernet 0/0 (F0/0) | Fast Ethernet 0/1 (F0/1) | Serial 0/1/0 (S0/1/0) | Serial 0/1/1 (S0/1/1) |
| 2811 | Fast Ethernet 0/0 (F0/0) | Fast Ethernet 0/1 (F0/1) | Serial 0/0/0 (S0/0/0) | Serial 0/0/1 (S0/0/1) |
| 2900 | Gigabit Ethernet 0/0 (G0/0) | Gigabit Ethernet 0/1 (G0/1) | Serial 0/0/0 (S0/0/0) | Serial 0/0/1 (S0/0/1) |
| Note: To find out how the router is configured, look at the interfaces to identify the type of router and how many interfaces the router has. There is no way to effectively list all the combinations of configurations for each router class. This table includes identifiers for the possible combinations of Ethernet and Serial interfaces in the device. The table does not include any other type of interface, even though a specific router may contain one. An example of this might be an ISDN BRI interface. The string in parenthesis is the legal abbreviation that can be used in Cisco IOS commands to represent the interface. | ||||
Device Configs – Final
Router R1
service timestamps debug datetime msec
service timestamps log datetime msec
service password-encryption
!
hostname R1
!
boot-start-marker
boot-end-marker
!
enable secret 4 06YFDUHH61wAE/kLkDq9BGho1QM5EnRtoyr8cHAUg.2
!
no aaa new-model
memory-size iomem 10
!
no ip domain lookup
ip domain name ccna-lab.com
ip cef
no ipv6 cef
multilink bundle-name authenticated
!
username admin privilege 15 secret 4 QHjxdsVkjtoP7VxKIcPsLdTiMIvyLkyjT1HbmYxZigc
!
interface GigabitEthernet0/0
no ip address
shutdown
duplex auto
speed auto
!
interface GigabitEthernet0/1
description Connection to S1-F0/5.
ip address 192.168.1.1 255.255.255.0
duplex auto
speed auto
!
interface Serial0/0/0
no ip address
shutdown
clock rate 2000000
!
interface Serial0/0/1
no ip address
shutdown
!
ip forward-protocol nd
!
no ip http server
no ip http secure-server
!
control-plane
!
!
banner motd ^C
****************************************
Unauthorized Access is Prohibited!
****************************************
^C
!
line con 0
password 7 00071A150754
login
line aux 0
line 2
no activation-character
no exec
transport preferred none
transport input all
transport output pad telnet rlogin lapb-ta mop udptn v120 ssh
stopbits 1
line vty 0
password 7 110A1016141D
login local
transport input telnet ssh
line vty 1 4
login local
transport input telnet ssh
!
scheduler allocate 20000 1000
!
end