Last Updated on November 1, 2018 by Admin
6.1.4.2 Lab – Hard Drive Maintenance in Windows 7 and Vista Answers
Lab – Hard Drive Maintenance in Windows 7 and Vista (Answers Version)
Introduction
In this lab, you will examine the results of using Disk Check and Disk Defragmenter on a hard drive.
Answers Note: If the hard drive is an SSD, do not let students perform the defragmentation. Defragmentation should not hurt the SSD, but it is not necessary with this type of drive.
Recommended Equipment
- A computer running Windows 7 or Vista
- Two or more partitions on the hard drive.
Step 1: Run the Error-checking Tool on a disk volume
- Log on to Windows as an administrator.
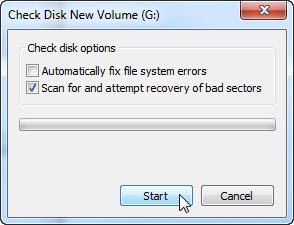
- Click Start > Computer. Right-click New Volume (G:) > Properties > Tools > Check Now.
Note: Substitute the volume name and drive (G:) for those used in your computer.
6.1.4.2 Lab – Hard Drive Maintenance in Windows 7 and Vista Answers 01
- Make sure there are no check marks in either checkbox. Click Start.
- The Your device or disk was successfully scanned window opens. Click the expand button next to See details.

6.1.4.2 Lab – Hard Drive Maintenance in Windows 7 and Vista Answers 02
How many stages were processed? ___________________________________________________
3 - Click Close.
- Select the Tools tab, and then click Check Now.
- Remove the check mark next to Automatically fix file system errors. Place a check mark in the checkbox next to Scan for and attempt recovery of bad sectors and click Start.
- The Your device or disk was successfully scanned window opens. Click the expand button next to See details.

6.1.4.2 Lab – Hard Drive Maintenance in Windows 7 and Vista Answers 03
What stages were processed? _______________________________________________________
1, 2, 3, and 5 - Click Close.
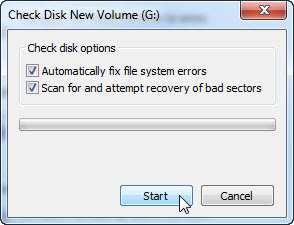
- Select the Tools tab > Check Now.
- Place a check mark in both checkboxes. Click Start.
- The Your device or disk was successfully scanned window opens. Click the expand button next to See details.

6.1.4.2 Lab – Hard Drive Maintenance in Windows 7 and Vista Answers 04
What stages were processed? ___________________________________________________
1, 2, 3, 4, and 5
What is being verified in each of the stages?____________________________________________________________________________________
____________________________________________________________________________________
____________________________________________________________________________________
Stage 1: files.
Stage 2: indexes.
Stage 3: security descriptors.
Stage 4: file data.
Stage 5: free space.
Were any problems found with the volume? _____________________________________
Yes or No.
If so, what are they?
____________________________________________________________________________________
____________________________________________________________________________________
Answers may vary. - Click Close and close all open windows.
Step 2: Check the Event Viewer for the Chkdsk log
- Click Start > Control Panel > Administrative Tools > Event Viewer.

6.1.4.2 Lab – Hard Drive Maintenance in Windows 7 and Vista Answers 05
- In the left pane, expand Windows Logs and click Application. Double-click the top event in the middle pane.

6.1.4.2 Lab – Hard Drive Maintenance in Windows 7 and Vista Answers 06
- If the displayed event is not Chkdsk, click the black down arrow until the Chkdsk event appears.

6.1.4.2 Lab – Hard Drive Maintenance in Windows 7 and Vista Answers 07
Which stages are shown as completed?
____________________________________________________________________________________
Answers may vary. 1, 2, 3, 4, and 5. - Close all open windows.
Step 3: Disk defragmenter
Note: Do not perform this step if your computer has an SSD drive. It is unnecessary to defragment SSD drives.
- Click Start > Computer, then right-click drive (C:) and select Properties. Click Tools > Defragment Now.
- The Disk Defragmenter window opens, click Defragment disk.

6.1.4.2 Lab – Hard Drive Maintenance in Windows 7 and Vista Answers 08
Note: In Windows Vista, an option window opens, click Defragment now…. In the Disks to defragment: window, check only (C:) > OK.
- Click Local Disk (C:) > Analyze disk.
What percentage of the disk is fragmented?____________________________________________________________________________________
Answers may vary - You should be able to watch the progress of the defragmentation process in the Disk Defragmenter window.

6.1.4.2 Lab – Hard Drive Maintenance in Windows 7 and Vista Answers 09
Note: Windows Vista Disk Defragmenter does not show the progress of the defragmentation process.
What is the first process during defragmenting (see Progress column)?____________________________________________________________________________________
Analyzed.
What are the three tasks performed for each pass (see Progress column)?____________________________________________________________________________________
Relocated, defragmented, and consolidated.
How many passes did it take to defragment drive C:?____________________________________________________________________________________
Answers may vary. 8 passes. - When defragmenting is completed, click Close.
- Close all windows.Note: It is not possible to view the detail of the defragmented hard drive through the GUI version of defragmenter.