Last Updated on November 23, 2020 by Admin
7.3.4 Lab – Connect to a Wireless Router Answers
Lab – Connect to a Wireless Router (Answers Version)
Answers Note: Red font color or gray highlights indicate text that appears in the Answers copy only.
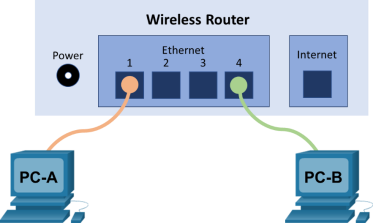
Topology
Addressing Table
|
Device |
Interface |
IP Address |
Subnet Mask |
Default Gateway |
|
PC-A |
NIC |
192.168.10.2 |
255.255.255.0 |
192.168.10.1 |
|
PC-B |
NIC |
192.168.10.3 |
255.255.255.0 |
192.168.10.1 |
Objectives
- Connect a PC to a wireless router using Ethernet cable
- Configure the PC with an appropriate IPv4 address
- Verify the PC configuration using a Command Prompt
Background / Scenario
For a PC to communicate in the local network and the Internet, it must be connected to a network device.
Required Resources
- 2 PCs (Windows 10 with wired Ethernet NIC on each PC)
- 1 wireless router
- 2 straight-through Ethernet cables
Instructions
Part 1: Connecting to the Network
Step 1: Connect the end devices.
- Power on the end devices and wireless router as needed.
- Connect two PCs to the wireless router using Ethernet cables.
Step 2: Configure the PCs with addressing information.
- In PC-A, right-click Start button > select Network Connections. If the Network status window opens, click Change adapter options to navigate to Network Connections.
- Select the wired network connection. Right-click the desired wired network connection and select Properties.
- Open the Internet Protocol Version 4 (TCP/IPv4) option to open the TCP/IP properties window.
- You will enter an IPv4 address configuration consisting of an IPv4 address, a subnet mask, and default gateway address. To enter the address information, click the Use the following IP address button.
- In the IPv4 address field, enter 192.168.10.2. In the subnet mask field, enter 255.255.255.0. In the default gateway field, enter 192.168.10.1. The DNS server information is not necessary at this time.
- When finished, click OK to return to the Internet Protocol (TCP/IPv4) Properties window. Click OK to apply the changes.
After the changes are applied, you will be returned to the Network Connections window.
- Because the two computers are on the same network, their IPv4 addresses will be similar, their subnet masks and default gateways will be identical. Perform the same procedures on PC-B to assign an IPv4 address, subnet mask, and default gateway using the following information:
Question:
Why do you think the IPv4 addresses are different, but the subnet masks and default gateways are the same?
Type your answers here.
Student’s own opinion on this. Each device on the network must have a unique identifier. The IPv4 address is one way of uniquely identifying each network host or device. The default gateway represents the way of communicating with devices that are NOT on your own network.
Step 3: Verify connectivity between the two PCs.
- In a Command Prompt window, enter ipconfig /all to verify the configured IPv4 address and the default gateway from the previous step for both PCs.
- From the command prompt on PC-A, test connectivity with the PC-B by entering ping 192.168.10.3.
- The pings should be successful. If the pings are not successful, perform the appropriate troubleshooting steps, such as checking the cabling and checking your IPv4 address, subnet mask, and default gateway assignments.
Part 2: Some Useful Windows Networking Commands
Within the Command Prompt window, you can access a few useful networking utilities besides the ones you have seen already: ipconfig, ping, and tracert.
Step 1: The hostname command
Besides the ipconfig /all command, you can print the name of the current host using the hostname command.
At a command prompt, enter hostname.
C:\Users\Student> hostname
DESKTOP-3FR7RKA
Step 2: The getmac command
Sometimes you just need to quickly list all the MAC addresses for the NIC on the PC. The getmac command could be quite useful.
At a command prompt, enter getmac.
C:\Users\Student> getmac
Physical Address Transport Name
=================== ==========================================================
00-50-56-B3-E8-C1 \Device\Tcpip_{B0D0B9B3-8A23-4B59-B930-323792047552}
02-00-4C-4F-4F-50 \Device\Tcpip_{31C9748F-BCD8-4C76-8AEB-D4BC482341B8}
Step 3: The route command
The route command allows you to manipulate the network routing table. For this example, you will print out the routes.
C:\Users\Student> route print
===========================================================================
Interface List
6…00 50 56 b3 e8 c1 ……Intel(R) 82574L Gigabit Network Connection
3…02 00 4c 4f 4f 50 ……Microsoft KM-TEST Loopback Adapter
1………………………Software Loopback Interface 1
7…00 00 00 00 00 00 00 e0 Microsoft ISATAP Adapter
5…00 00 00 00 00 00 00 e0 Microsoft ISATAP Adapter #2
===========================================================================
IPv4 Route Table
===========================================================================
Active Routes:
Network Destination Netmask Gateway Interface Metric
0.0.0.0 0.0.0.0 192.168.1.1 192.168.1.11 10
127.0.0.0 255.0.0.0 On-link 127.0.0.1 306
127.0.0.1 255.255.255.255 On-link 127.0.0.1 306
127.255.255.255 255.255.255.255 On-link 127.0.0.1 306
169.254.0.0 255.255.0.0 On-link 169.254.5.92 266
169.254.5.92 255.255.255.255 On-link 169.254.5.92 266
169.254.255.255 255.255.255.255 On-link 169.254.5.92 266
192.168.1.0 255.255.255.0 On-link 192.168.1.11 266
192.168.1.11 255.255.255.255 On-link 192.168.1.11 266
192.168.1.255 255.255.255.255 On-link 192.168.1.11 266
224.0.0.0 240.0.0.0 On-link 127.0.0.1 306
224.0.0.0 240.0.0.0 On-link 192.168.1.11 266
224.0.0.0 240.0.0.0 On-link 169.254.5.92 266
255.255.255.255 255.255.255.255 On-link 127.0.0.1 306
255.255.255.255 255.255.255.255 On-link 192.168.1.11 266
255.255.255.255 255.255.255.255 On-link 169.254.5.92 266
===========================================================================
Persistent Routes:
None
IPv6 Route Table
===========================================================================
Active Routes:
If Metric Network Destination Gateway
1 306 ::1/128 On-link
6 266 fe80::/64 On-link
3 266 fe80::/64 On-link
3 266 fe80::8050:173e:a32b:55c/128
On-link
6 266 fe80::ac29:44a8:6409:c30e/128
On-link
1 306 ff00::/8 On-link
6 266 ff00::/8 On-link
3 266 ff00::/8 On-link
===========================================================================
Persistent Routes:
None