Last Updated on January 28, 2021 by Admin
10.2.3.5 Packet Tracer – Configuring Syslog and NTP
From year to year, Cisco has updated many versions with difference questions. The latest version is version 6.0 in 2018. What is your version? It depends on your instructor creating your class. We recommend you to go thought all version if you are not clear. While you take online test with netacad.com, You may get random questions from all version. Each version have 1 to 10 different questions or more. After you review all questions, You should practice with our online test system by go to "Online Test" link below.
Packet Tracer – Configuring Syslog and NTP (Answer Version – Optional Lab)
Answer Note: Red font color or gray highlights indicate text that appears in the Answer copy only. Optional activities are designed to enhance understanding and/or to provide additional practice.
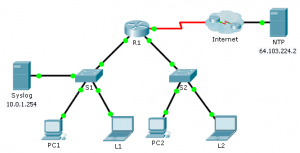
Topology

10.2.3.5 Packet Tracer – Configuring Syslog and NTP
Objectives
Part 1: Configure Syslog Service
Part 2: Generate Logged Events
Part 3: Manually Set Switch Clocks
Part 4: Configure NTP Service
Part 5: Verify Timestamped Logs
Scenario
In this activity, you will enable and use the Syslog service and the NTP service so that the network administrator is able to monitor the network more effectively.
Part 1: Configure Syslog Service
Step 1: Enable the Syslog service.
- Click Syslog, then Services tab.
- Turn the Syslog service on and move the window so you can monitor activity.
Step 2: Configure the intermediary devices to use the Syslog service.
- Configure R1 to send log events to the Syslog server.
- R1(config)# logging 10.0.1.254
- Configure S1 to send log events to the Syslog server.
- S1(config)# logging 10.0.1.254
- Configure S2 to send log events to the Syslog server.
- S2(config)# logging 10.0.1.254
Part 2: Generate Logged Events
Step 1: Change the status of interfaces to create event logs.
- Configure a Loopback 0 interface on R1 then disable it.
- R1(config)# interface loopback 0
- R1(config-if)# shutdown
- Turn off PC1 and PC2. Turn them on again.
Step 2: Examine the Syslog events.
- Look at the Syslog events. Note: All of the events have been recorded; however, the time stamps are incorrect.
- Clear the log before proceeding to the next part.
Part 3: Manually Set Switch Clocks
Step 1: Manually set the clocks on the switches.
Manually set the clock on S1 and S2 to the current date and approximate time. An example is provided.
S1# clock set 11:47:00 July 10 2013
Step 2: Enable the logging timestamp service on the switches.
Configure S1 and S2 to send its timestamp with logs it sends to the Syslog server.
S1(config)# service timestamps log datetime msec
S2(config)# service timestamps log datetime msec
Part 4: Configure NTP Service
Step 1: Enable the NTP service.
In this activity, we are assuming that the NTP service is being hosted on a public Internet server. If the NTP server was private, authentication could also be used.
- Open the Services tab of the NTP server.
- Turn the NTP service on and note the date and time that is displayed.
Step 2: Automatically set the clock on the router.
Set the clock on R1 to the date and time according to the NTP server.
R1(config)# ntp server 64.103.224.2
Step 3: Enable the logging timestamp service of the router.
Configure R1 to send its timestamp with the logs that it sends to the Syslog server.
R1(config)# service timestamps log datetime msec
Part 5: Verify Timestamped Logs
Step 1: Change the status of interfaces to create event logs.
- Re-enable and then disable the Loopback 0 interface on R1.
- R1(config)# interface loopback 0
- R1(config-if)# no shutdown
- R1(config-if)# shutdown
- Turn off laptops L1 and L2. Turn them on again.
Step 2: Examine the Syslog events.
Look at the Syslog events. Note: All of the events have been recorded and the time stamps are correct as configured. Note: R1 uses the clock settings from the NTP server, and S1 and S2 use the clock settings configured by you in Part 3.
From year to year, Cisco has updated many versions with difference questions. The latest version is version 6.0 in 2018. What is your version? It depends on your instructor creating your class. We recommend you to go thought all version if you are not clear. While you take online test with netacad.com, You may get random questions from all version. Each version have 1 to 10 different questions or more. After you review all questions, You should practice with our online test system by go to "Online Test" link below.